PHP program to calculate sum of two numbers:
- <?php
if(isset($_POST[‘form1’])) {
$F_No = $_POST[‘FirstNumber’];
$S_No = $_POST[‘SecondNumber’];$msg = “”;
$total = 0;
$valid_Flag=1;if(empty($F_No)){
$msg .= “Please give first value<br>”;
$valid_Flag=0;
}
else
{
$total = $F_No;
}if(empty($S_No)){
$msg .= “Please give second value<br>”;
$valid_Flag=0;
}
else
{
$total =$total + $S_No;
}if($valid_Flag ==0 ){
echo ”“.$msg.”“;
}
else
echo $total;
}
?><!DOCTYPE HTML>
<html lang=”en-US”>
<head>
<meta charset=”UTF-8″>
<title>Catch the submit button value to the same page</title>
<style type=”text/css”>
.error {
color: red;
}
</style></head>
<body><form action=”index.php” method=”post”>
<table>
<tr>
<td>First Number: </td>
<td><input type=”text” name=”FirstNumber”/></td>
<!–<td><input type=”text” name=”FirstNumber” placeholder=”Give First Number” value=”1″/></td>–>
</tr>
<tr>
<td>Second Number: </td>
<td><input type=”text” name=”SecondNumber”/></td>
<!–<td><input type=”text” name=”SecondNumber” placeholder=”Give Second Number” value=”1″/></td>–>
</tr><tr>
<td><input type=”submit” value=”Add” name=”form1″/></td>
</tr>
</table>
</form>
</body>
</html> - don’t use any placeholder in the input element.
PHP has two operators that are specially designed for strings.
- The first is the concatenation operator (‘.’), which returns the concatenation of its right and left arguments.
- example:
- <!DOCTYPE html>
<html>
<body><?php
$txt1 = “Hello”;
$txt2 = ” world!”;
echo $txt1 . $txt2;
?></body>
</html>
- The second is the concatenating assignment operator (‘.=‘), which appends the argument on the right side to the argument on the left side. (append = add something to the end)
- example:
- <!DOCTYPE html>
<html>
<body><?php
$txt1 = “Hello”;
$txt1 .= ” world!”;echo $txt1;
?></body>
</html> - Appends world! to $txt1
There are two ways to use HTML on your PHP page.
html form is the collection of elements. That is html form is a container that contains several html elements. For example:
- input element (The most important form element is the <input> element.)
- Example: <input type=”text” name=”fname” value=”John”>
- No closing tag.
- option element (defines an option that can be selected.)
- Helps to create drop-down list inside an HTML form.
- <option value=”volvo”>banana</option>
- Has closing tag.
- select element (defines a drop-down list)
- textarea element (defines a multi-line input field )
- button element (defines a clickable button)
- <button name=”subject” type=”submit” value=”fav_HTML”>HTML</button>
- Has closing tag.
HTML5 added the following form elements:
- datalist element (specifies a list of pre-defined options for an <input> element.)
- keygen element
- output element (represents the result of a calculation)
Attributes provide additional information about HTML elements.
HTML Attributes:
- All HTML elements can have attributes
- Attributes provide additional information about an element
- Attributes are always specified in the start tag
- Attributes usually come in name/value pairs like: name=”value”
value attribute:
- For button, input and option elements, the value attribute specifies the value of the element.
- For li elements, the value attribute sets the value of an ordered list item. The following list items will increment from that number.
- For progress elements, the value attribute specifies how much of the task has been completed.
- For param elements, the value attribute specifies the value of a <param> element.
The value attribute specifies the value(or initial value for text box) for an input field/element.
The value attribute can be used on the following elements:
- button
- input
- li
- option
- progress
- param
- Example: (Button)
- <form action=”demo_form.asp” method=”get”>
Choose your favorite subject:
<button name=”subject” type=”submit” value=”fav_HTML”>HTML</button>
<button name=”subject” type=”submit” value=”fav_CSS”>CSS</button>
</form> - Two buttons with equal names, that submit different values when clicked
- pass the value of the button which is submitted to the server.
- <form action=”demo_form.asp” method=”get”>
- Example: (Input)
-
<form action=”demo_form.asp”>
First name: <input type=”text” name=”fname” value=”John”><br>
Last name: <input type=”text” name=”lname” value=”Doe”><br>
<input type=”submit” value=”Submit form”>
</form> - First textbox show John and Second textbox Doe
-
Id attribute:
- Valid on any element except
<base>,<html>,<head>,<meta>,<param>,<script>,<style>,<title> - Each Id should be unique in the page
- Is referenced in CSS with
#sign - Is referenced in JS with
getElementById(), and jQuery by$(#<id>) - Must begin with a letter
- case insensitive
- But in HTML 5 it is valid for any element.
- The id attribute specifies a unique id for an HTML element (the value must be unique within the HTML document).
- Must not contain any space characters.
- In HTML, all values are case-insensitive
- Must contain at least one character.
- Specifies a unique id for the element.
- Use the id attribute to link to an element with a specified id within a page.
- Example:
<html>
<body> <h2><a id=”top”>Some heading</a></h2>
<p>Lots of text….</p>
<a href=”#top”>Go to top</a> </body>
</html>
Name attribute:
- Valid only on
<a>,<form>,<iframe>,<img>,<map>,<input>,<select>,<textarea> - Name does not have to be unique, and can be used to group elements together such as radio buttons & checkboxes.
- Used on form elements to submit information. Only input tags with a
nameattribute are submitted to the server - The name attribute specifies the name of an <input> element..
- The name attribute is used to reference form data after a form is submitted.
- Only form elements with a name attribute will have their values passed when submitting a form.
- In HTML 5 Not valid on
<form>anymore- Example:
-
<form action=”demo_form.asp”>
Name: <input type=”text” name=”fullname”><br>
Email: <input type=”text” name=”email”><br>
<input type=”submit” value=”Submit”>
</form>
for attribute:
- The for attribute specifies which form element a label is bound to.
- The
forattribute is used in labels. It refers to the id of the element that label is associated.- Example
- <html>
<form>
<label for=”firstname”> First name:</label><br>
<input type=”text” id=”firstname” name=”firstname”><br>
<label for=”last_name”> Last Name:</label><br>
<input type=”text” id=”last_name” name=”lastname”>
</form>
</html>
- Now when the user clicks with the mouse on the Firstname: text the browser will automatically put the focus in the corresponding
inputfield. - The id field value and for field value must be same.
<!–This is a comment. Comments are not displayed in the browser–>
<!–comment goes here–>
- padding is the space inside of an element that hold the content of an element away from its edge.
padding-top: padding: 10px 20px 15px 10px;
padding-right: padding: 10px 20px(left & right) 15px;
padding-bottom: padding: 10px(top & bottom) 20px(left & right);
padding-left: padding: 10px; applies to all sides - most element don’t have any padding if we don’t explicitly declare.
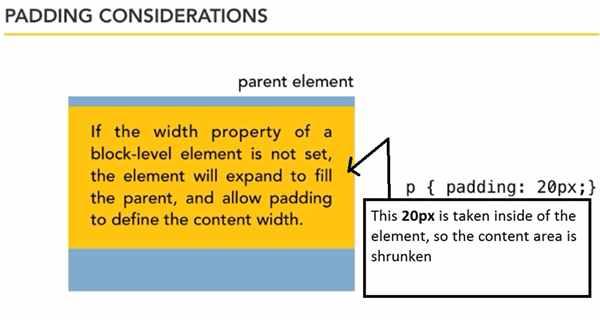
- by default block level element such as <p> takes the full width of its parent

- now if we declare the padding then it takes space from inside of the content.

- vertical margin collapse means that from two elements(one stack to other) only one’s margin applies and which one is larger that will be applied.


- please follow along the video


Box model
- Every single element on your web page is considered to be in a rectangular box.

The properties of this box is:
- Margin: Transparent or invisible but exist. Margin represents the space around an element & it is used to define the space between the page element. Margin are not used to calculate the final width of an element.
- Border: Visible. Most element don’t have any border. It has three properties
border-width:
border-color:
border-style:
- Padding: by default transparent(depends on user). space added inside the border. Its value is used to calculate overall width and height of an element

- Width: content width. Inside of the element
height: content height.
These properties not only defines the size of the element but also defines how it relates with surroundings. - Content: the writings inside the box
Element: related with the box.


see the video:
I am going to show you with an example
- first write body for body tag
- Then give < on the left side of body tag i.e <body
- Then give > on the left side of body tag i.e <body>
- Then u will see the auto-completion of </body>
This i have practice in NotePad++ editor. If u like this then please share this article, Thanks.
